CROSSLEY VEHICLES TODAY
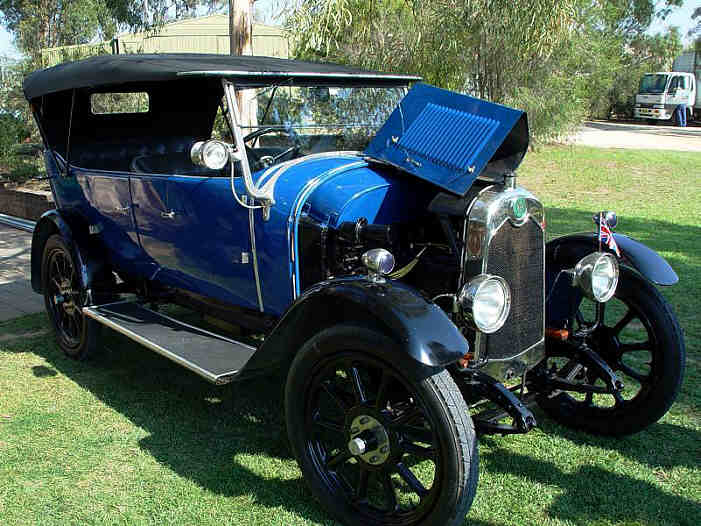
1923 15/30 Tourer
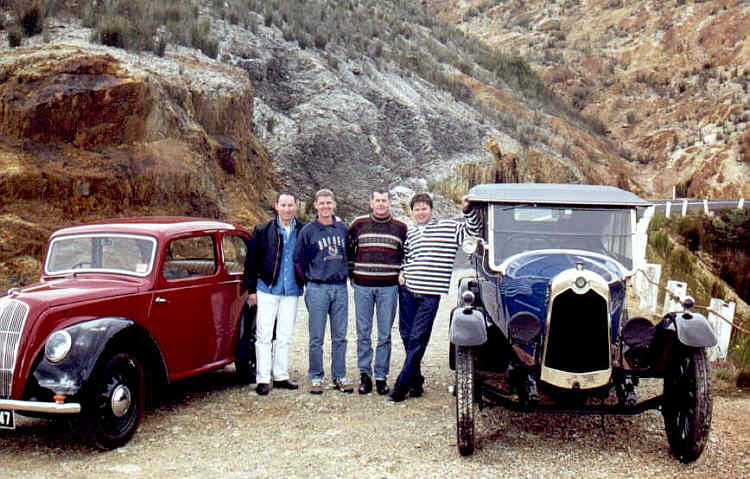
During the journey he covered 1300km with no mishaps except one puncture and a leaking radiator header tank. The other car is a Morris 8 he met near Queenstown on Tasmania's west coast.
(Photo - Kerry Morris)
(Photo - Robert Tenney)
Robert Tenney is the third generation of his family to own this car which he restored himself. The car is the fourth oldest to survive and the second oldest currently on the road. It has brakes on the rear wheels only, 23 inch beaded edge tyres and has the raked windscreen, both typical on the early models.
Chassis number is 25425 and engine number is 25456.
Robert has written the story of life with his car.
The Restoration Story
I still remember the day when my father bought home a tired looking 1923 Dodge to what I referred to as "an old bomb" and thought 'why!'... as most four year old children would think. It wasn't long after when I was told to hold a spanner to a nut from under the 1923 Dodge and as time went on, I gradually watch my father transform the Dodge into a magnificent car. This car has left me with many cherished memories of nostalgic vintage car motoring; hence the love of vintage and veteran motoring was seeded in my mind.
At the age of 9, I was very excited when my father decided to give me a 1926 Chrysler Roadster with plans of restoring the car together. These plans never eventuated due to my parents breaking their marriage. The Crossley on the other hand was purchased in 1965 by my late grandfather and father at an auction for 300 pounds. This car was then stored in an open shed a long side the Chrysler on my grandfather's farm for another 10 years. When I was at the age of 13, my grandfather passed away. My grandmother then made the decision to give each family member a vintage car. With the acquisition of the Crossley, a Chrysler and a passion for music and no keyboard instrument to practice on, I had to make a decision on which car to sell. I preferred the English elegance and ornamented craftsmanship of the Crossley, the Chrysler had to go.
Not a great deal of history is known about this Crossley, The drivers side door pocket reveal a driver's license belonging to David Gilmor from Terang, dated 1936. There is also a strong possibility of the owners having a keen interest in golf, owing to the spiked holes in the floor matting. What I do know is that during the later part of the 1930s, the Crossley was involved in a severe collision in Tocumwal (on the Victorian border) due to the driver's over indulgence of alcohol. At first sight the damage appeared to be reasonably simple with just the front axle torn off, the front right mudguard shaped into a foot long concertina plus a few other bent and broken pieces in need of attention.
The body appeared to be fine apart from the tub section that broke away from the rest of the body when it was removed from the chassis. The motor was a little stiff and the car was almost rust free and 95% complete.
In 1977, I eagerly began the task of dismantling the chassis only to reveal the true extent of the damage. The whole front half of the chassis had been bent 13" across to the right, placing the side 'C' section in line with the centre of the chassis. As the chassis is the base for all other components to be attached, it need prior attention. My mother and I then decided to pay half each as a gift for my 15th birthday to have the chassis corrected in a chassis jig. I then began stripping down the body only to find out that the timber frame had also been severely damaged. It had become evident that the damage had spread throughout the entire car. Signs of a previous incident were also evident owing to the crude repair work on the right side door skins, side panel and associated coach timbers.
From 1979 to 1984 my family and I were on the move, this caused major disruption to the project when the Crossley was moved to five different locations. The car was completely dissembled in boxes and dragged back and forth up to 180 km's in some cases. Not a great deal of restoration work was achieved during this period, though I did manage to hunt around for replacement parts. These parts included a front axle, front springs, headlamp forks, bell housing, steering-box housing and arm etc. The four out of five wheels on the car had been reduced from 23" Beaded edge to 18" Well based wheels which needed to be brought back to correct size for originality. Missing parts included the speedo, one front parking lamp and later, a lost horn. My first big find was a Ute load of Crossley parts and a few leads of other Crossley cars from other enthusiasts at the Bendigo Swap meeting. I made several attempts to locate these cars until I had finally located one down in the back blocks of the central Victorian farming district. This car had been exposed to the elements for a considerable time owing to the few remaining rotten body timbers and panels hanging off the chassis, the rest of the car laid around the farm in pieces. The wreck was very useful for my restoration project while the farmer was very pleased to be paid to have the car removed.
Now with all the broken parts replaced, the springs were then re-tempered; the chassis, axles and other relevant parts were re-bushed and sent to the sand blasters. The brakes were reconditioned, new Kingpins were made and the differential was cleaned, checked and reassembled. The whole lot was then painted with undercoat and reassembled to a rolling chassis. The chassis and other parts were then finally prepared and painted in black enamel. At this stage of the project, I really felt like I had finally achieved something by having a rolling chassis.
The top end of the motor was sent to the engineers for reconditioning. Instead of using the original piston design with thick rings, I decided to use Toyota Corona pistons. These pistons weigh a lot less, are certainly far better designed and place less stress on the motor. When it came to the bottom end of the motor, some valued advice from another club member telling me how to get another 15 years out of your original bearings and journals, his advice saved thousands of dollars worth of reconditioning. His method included the use of wet and dry sandpaper on a flat plate of glass, shim brass, a broken ring, some blueing oil and patience to grind the bearing caps down to size. The magneto was re-magnetized by a specialist. The starter motor and dynamo only needed new bearings, brushes, a clean and a coat of paint. I was also able to buy a reproduction Bendix drive for the starter motor normally used in a T Ford that only required a little modification. Once the clutch was reconditioned, I then reassemble the crankcase section of the motor and placed it into the chassis followed by the cylinder block assembly and firewall. Eventually after making the muffler (using the original cast iron ends) and repairing the damaged sump, it was time to get the motor running. I blocked off the lower water pipe and filled the block with water. With the use of jumper leads connected from my other car I then zapped the starter motor into action. After only a few turns I noticed the fan quietly turning without assistance, so in disbelief I pulled on the throttle to hear the motor burst into life for the first time with a healthy plume of smoke.
With the electrical wiring, most of the rubber in the armoured wiring had perished. It was replaced with reproduction armoured wire. Heavier gauged triple core armoured wire was not available so to get around this problem, I decided to make it by spinning the armoured wrapping from the old wire to the new. To do this, I used a hand drill laying on its side in the vice on one side of the shed while a bearing and spring were attached to the other side, the new wires were then strung from the drill chuck to the bearing. When I was installing the wiring, I at first decided to copy the original wiring design by providing an earth return wire, though later the return wire proved to be more useful when I was told that the car required brake lights by law. After some rewiring, the chassis has now been converted to negative earth. Rather than wasting the remaining wires, I used them to install traffic indicators.
The body required quite a lot of attention. Around 60% of the timber frame parts were worn, rotten or severely damaged due to the incident. After dismantling the body, my first job was to rebuild the base of the body. With the little carpentry knowledge I had learnt from secondary school, persistence, and many hours of labour, I gradually carved out most of the complex shapes of the base and rebuilt it on top of the chassis. Most of the difficult cornerings, arches and the drivers side door pillars on the upper frame had to be replaced. These pieces certainly test my patience, especially the top corners of the front seat. The rear wheel arches (and rear hood bow) were steam-bent in Echuca by the same people who restore the steam paddle boats. I soon learnt to appreciate the skilled craftsmanship from the coach builders of the day from my own experience of coach building, even when they didn't get the two sides of the body to be of equal dimensions. The Vehicle Restoration hobby course held at Goulburn Valley TAFE College in the evening, proved to be extremely useful. I was soon taught the craft of panel beating. My instructor would always say, "anything is possible with sheet metal". So after developing my panel beating technique on some of the easier panels, I was then encouraged to make the missing front mudguard myself. After a period of time and some assistance, I finally fabricated the desired shape. I also decided to replace the two right hand door skins and the right side panel as the original panels were too stretched for my liking from the previous panel repair work. The body was then reassembled at home on top of the chassis.
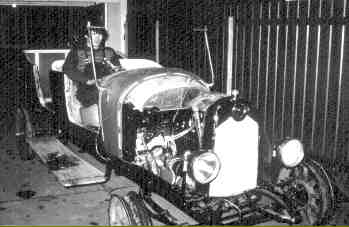
Around this stage, I thought it was time to make the car driveable. The gears in all of the three gearboxes I had were fairly worn and rough, so I chose the least worn gears and hoped for the best. Once the drive train was in place, I then set up a few cushions for a seat and drove the car on the 18" rims up and down the driveway. Within minutes John popped his head over fence thinking that there was a tram in my driveway. With great delight, he then raced around with his camera to take some photos. (Unfortunately all photos previous to the photos taken by John of my car have been lost in my travels.) With the body rubbed back, I then filled it with lead and putty and finally undercoated the body. The panels were built up with spray putty followed by a guide coat. After much preparation and more undercoats, I then painted the body with 7 to 8 coats of blue acrylic lacquer, rubbing it down with 1200 paper between every 2 coats.
Once the body was reunited to the chassis my enthusiasm soared. Not
long after, the doors and bonnet were also fitted to the car. I had the
nickel plating of the bright ware done by a firm in Melbourne, though
much to my annoyance, they had lost my handbrake. I was also not
impressed when they later sent me someone's rare veteran handbrake in
the mail. I was fortunate to have found a spare handbrake that was
previously buried under dirt with only 2" exposed, when tripping over it
on my search for parts on a farm. The windscreen frame proved to be one
of the most frustrating exercises, The frame had twisted and the bottom
corners of the side posts had cracked from the incident. I found the
bronze castings very difficult to weld and achieving the correct angles
of the frame a real headache! With the frame re-plated in nickel and the
lower glass set into the frame, I then proceeded by fitting the
windscreen to the body. Soon after, I noticed a bow in the glass and
within 5 minutes, the glass began to crack. Whilst leaning against the
side post, in disbelief the side post then broke off at the weld. The
other post also broke with a push. My enthusiasm at this stage of the
restoration was at an all time low! Once my confidence had regained, I
then tried another welding technique and this time I thoroughly tested
the strength of the side posts.
Having decided that it would be more interesting to do the upholstery
myself. I enrolled in an upholstery hobby course at the TAFE College,
learnt the correct techniques and eventually completed the interior with
the original design pattern. The sewing machine I used was my mum's 1962
domestic Japanese made Atlas that handled the work very well.
Many hours were spent, welding all the wheel edges and the inner tyre resting band back onto the wheels. I also repaired the speedo, speedo cable and other instrumentation that included re-drawing the numbers onto some of the instruments. Damage also extended to the hood bows, which had broken in a few places, and were bent out of alignment, having spent hours reshaping the bows, they were then powdercoated in black. As my patience was wearing thin, I then decided to prepare the Crossley so I could at least get it registered and experience the pleasures of vintage motoring. The front mudguards also required work with the presence of the car at the TAFE College, so the guards were brushed with cheap black paint and were fitted to the car for the time being. After fitting a battery clamp, the Crossley then passed the roadworthy and was fully registered in November 1991. By this time, I was fed up with the spray painting fumes so the front mudguards were taken off to a panel repair shop and painted with two-pack paint to minimise stone chipping.
The Crossley's first major trip was to the Echuca Steam Rally in June 1992, accompanied by my stepfather and another Crossley enthusiast who sat in the back seat all the way to Echuca. On arrival to the show grounds, Bob was just speechless; in fact his face was nearly frozen solid! This problem and the heavy rain incurred on the way home prompted me to my next challenge, "cover the hood"! On my first attempt I tried to carefully copy the original material and stitch it with little success. The second time around after using more material, I placed the material upside-down on the hood bows and attached it at both ends. I then stapled the side strips to the centre piece to hold it into the desired shape with the use of a paper stapler and sewed them together with the sewing machine. With the hood successfully completed, the next job was to do the side curtains. These seemed to take forever, however with my friend's wedding looming; I reassured the bride-to-be that it wouldn't be windy in the back seat of the Crossley on her wedding day. This meant spending many late nights sewing side curtains in the week before the wedding. By around 4.00 am on the morning of the wedding, I had finished all but the drivers curtain. It was quite a busy wedding for me that day, not only did I chauffeur the couple around to their selected venues, I also played the organ at the reception.
I encountered some teething problems when first driving the car on the road, the most expensive being the gearbox as the old gears were sounding rather unhealthy. With the generous assistance of my great uncle who cut the blanks on his lathe, I now have a new set of gears. The clutch posed a few more problems. The first being the large cone spring which would slip out of its retainer to one side and lock up the clutch at higher engine speeds. Meanwhile the pressure plate would disengage unevenly in a loose manner, causing drag on the clutch plate due to the nature of its design. A few modifications to the clutch remedied these faults. The radiator needed more professional attention due to the cars rapid ability to boil. The Crossley still boils due to the absence of a water pump, although a lot less than before. Regular checking after every 100 km has alleviated this problem for the time being. After being unable to find a matching front parking lamp, I decided to teach myself from library books the process of metal spinning. With the use of wood lathe, I managed to successfully complete the second parking lamp and two divers helmet tail lamps with brake/indicators lights combined into the units.
Within the first 150 km's of road use, the car handled the road extremely well until the suspension wore in, the car then became a nightmare to drive. After installing a pair of friction shockers on the rear, the Crossley is now a pleasure to drive. The two wheel braking system works surprisingly well so long as you plan further ahead when driving. The gear ratios are not well spaced because of the large ratio jump from second to top gear with an overall ratio being quite high. The Crossley's cruising speed is around 50 mph with a maximum speed of 70 mph. Fuel consumption is between 23 and 27 mpg.
The Car has been in quite a few events over the years now. In 2009 a big end in the motor started to fail which was fairly close to the predicted 15 year life span expect out of the original engine bearings. The conrods were starting to crack so it was better and almost the same price to have new conrods made by a specialist. Each new conrod has a tandem pair of Toyota Yaris slipper bearings. The crankshaft has bronze backed main bearings with diesel engine white-metal for longer life, The engine also has new valves and seats, balanced crank and flywheel, re-profiled camshaft and a seal on the back of the engine to stop oil fowling the clutch plate. Hopefully the engine will now out last me.
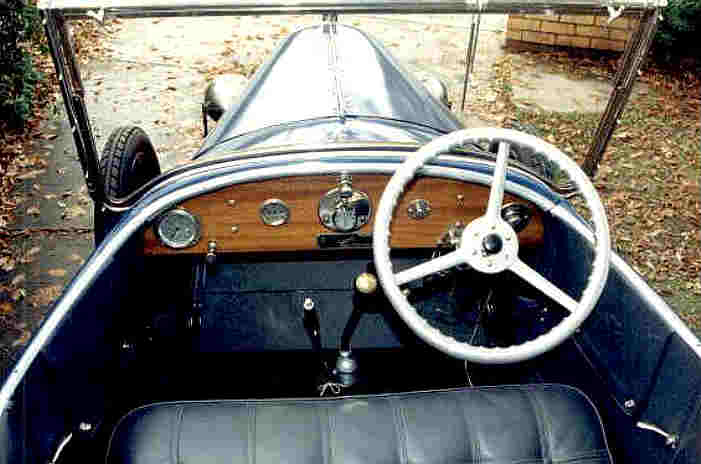
The Crossley was made in March 1923; the body was made at the Crossley factory and features a rare and unusual windscreen. The chassis, engine, body and a lot of other mechanical parts are stamped with the numbers 25425 indicating that the car was certainly hand made. The car is fitted with Rotax electrical equipment, Smiths speedometer and oil pressure gauge, a Solex carburetor and a magneto made by ML. When I was in the process of restoring the car, I always worked on more than one section or component at a time. This method made the job of restoring a lot easier whenever I was bored or perplexed with other components I was restoring. In each case, if a section or component was troubling me, I would leave it for a while and then attend to it at a later date with a refreshed approach. I enjoyed the challenge of doing most of the restoration work myself, with the only real limitation being the lack of machinery. I have also learnt a great number of skills through the restoration process, though now I have no desire to do it all over again.